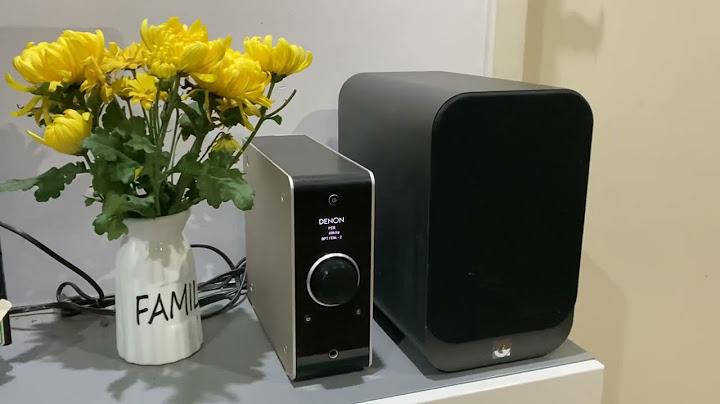
I started writing this review over a year before MENG announced their new Leo 1A4 kit, so apologies if you were expecting something other than old-school plastic here! Still, the point of this review is to have something available online for those wanting to know about the Revell and Italeri Leopard 1 kits, as there is very little in the way of accessible detailed kit reviews of these 30 year old beasts. Hopefully it can serve as a baseline for the inevitable comparisons to the new MENG kit! Show Introduction In 1965 the Bundeswehr introduced the world to the future of MBT design in the form of the Leopard. These first tanks featured a cast turtle-shaped turret and welded hull with sloping sides, eventually being branded �Leopard 1� after the massively improved Leopard 2 appeared a decade later. The Leopard 1 was built in several production batches that each incorporated minor changes, but the major variants are �1A1� (batches 1-4), �1A2� and �1A3� (batch 5, split by different turret designs), and �1A4� (batch 6). Of these, the 1A3 and 1A4 versions used a new welded boxy turret from Blohm and Voss, featuring composite armour. Visible differences included a square infantry phone box on the rear hull (first batch only) later changed to a round one, hull-side exhaust covers with vertical dividing bars (first three batches) later changed to covers with uninterrupted slots on batches 4-6, and of course the welded turret of the A3 and A4. From batch 2 the hull got a splash ring around the turret base, and large lifting eyes were added to the front and rear from batch 3. Many of these detail improvements were important enough to be added as older tanks got overhauled, so the only dependable spotting features that survived the 1A5 upgrade to denote early batches are the infantry phone and exhaust covers. When the BW decided to upgrade the cast-turret Leopards with added turret armour and a new camera-based targeting system they re-worked existing tanks from the 1A1 and 1A2 series, leading to subtle differences in non-critical details between the original batches. The 1A1 tanks became the 1A1A1, 1A1A2, 1A1A3 and 1A1A4 models, depending on radios and other internal items, but all of them featured the add-on armour and big PZB camera in its distinctive cage on the gun mantlet, opposite the searchlight box. At the same time as the 1A1A1 upgrade, some 1A1 tanks received a whole new EMES target sighting and laser ranging system to replace the TEM optical range finder (with its characteristic lenses in armoured blisters that resembled �frog eyes� either side of the turret) and became 1A5 models. The laser system was housed in a box on the turret roof, and this box (along with the lack of �frog eyes�, searchlight, and PZB camera tube) marks the visible difference between the 1A1A1-4 and 1A5 models. Some 1A3 tanks were similarly upgraded to the new EMES system. Information gleaned mainly from the excellent Tankograd books 5013 & 5014, as well as the web. models Back in the late 1970s Italeri took the modelling world by storm with its stunning kit of the Leopard 1A4 (kit 224, also released by Testors in the United States as805). It was beautifully detailed for the time, outshining the comparatively crude offerings from Tamiya. This was then followed up with several incarnations of the Leo 1 with cast turret, including a 1A2 (Italeri374), 1A1A1-4 (Revell03017, same as Italeri374), and 1A5 (Italeri6481 and Revell03028) in conjunction with Revell. All of them use the hull and wheel sprues from the 1A4 kit, so they represent the later versions as regards tool placement etc.This Leo 1A5 kit was reviewed here as well as by John Lavallee on the old ipmslondon.ca website (my link no longer works!) quite a long time ago, but there are no pictures so I thought it worth doing a new review for those who might be thinking of getting their hands on this kit. It may be out of production, but it turns up in shops, shows, and auction sites frequently, and of course Italeri is currently listing its own boxing ( 6481) as available. As I also have the Italeri Leo 1A4 and Revell Leo 1A1A1-4 in the stash I shall be drawing comparisons along the way.Contents Inside Revell�s typical end-opening soft cardboard box I found an A4-size instruction booklet (with decal sheet tucked inside) and a single plastic bag containing all the kit sprues. While this keeps the kit together for packing and transport, it allows the parts to rub together � some of mine have whitish marks from this friction. The bag also has small air-holes, so loose tiny parts can still escape. By contrast, my Italeri kit has no bag at all. There are four dark green sprues holding 386 parts, as well as a set of vinyl tracks and grousers on a sprue. Two of the sprues (A & B, the wheel and upper hull ones) come straight from the ancient 1A4, but are still decent even by today�s standards. The turret/lower hull sprue C comes from the 1A2 & 1A1A1-4 kits, while the turret armour sprue D is a modification of the same from the 1A1A1-4 kit, with the PZB camera parts deleted and the laser sight parts added. Interestingly, both sets of parts are shown on the sprue in Italeri�s boxing of the 1A5 ( 6481), suggesting that Revell have simply closed off the gates to different areas of the mould depending on the intended kit.I found no significant sink-holes (an Italeri specialty!) in my sample, apart from a few on the suspension arms that should be hidden when built. review Hull Starting with the basics, the overall dimensions all seem to fall within a millimetre of the drawings in the Tankograd books, even allowing for my �ruler & Mk 1 Eyeball� technology! Detail on the parts is good, although in some cases edges are a little �soft�, but today we might expect the tools moulded separately to their brackets, rather than as a single part. Another thing that shows the age of the tooling is the use of �outlines� for parts placement, moulded onto the upper hull. These can be filled (they are depressions), but will be hidden anyway if you add all the gear. Stowage for these tanks was pretty standard in the photos I�ve seen, so there is little need to move things and expose the outlines. Bear in mind the stowage layout is only appropriate to later Leos, coming as it does from the 1A4 kit � if you want to back-date any of the Leo 1 kits to the initial batch prior to upgrades you�d need to look at references because some of the tools were in different places on the early ones. A very nice touch is the presence of decent weld seams. Way back in the 1970s it seems Italeri predicted the main gripe of modellers in the second decade of the new millennium! Not only do we have welds along panel lines � we even get them around the mounting points for items like the lift rings. The 1A4 kit came with the later side exhaust grilles without vertical dividers, and these are still included. There are also new �early� grilles with the dividers and the raised rear section to represent an early-batch hull. Some of the marking schemes call for one or other of these options, which are shown on the painting guide, so it�s best to choose before building. Note also that the turret sprue includes the early square infantry telephone box for the rear hull, as fitted to the first batch tanks � these could survive on upgraded vehicles so having the option is a nice touch. Sadly, neither phone box is designed to be shown open. One of the rare faults in the old 1A4 hull is the air intake grille on the rear deck. Italeri gives a simple piece of mesh to fill the hole, but the real one had an underlying metal frame and a square central attachment point for the lifting apparatus needed to remove the whole deck for engine replacement. (Tamiya got this right on their 1A4�) A replacement for the air intake grille is available from Perfect-Scale that provides both the central lifting attachment and the underlying framework, and a whole etch set including the grille is available from Eduard. Suspension & tracks Unlike Tamiya, Italeri managed to get the road wheel diameter right. But even so, one of the real accuracy issues has always been the wheels � Italeri cut the tooling with odd little grooves spaced around the �rubber� treads. My guess is they saw lines on photos where the gaps between track pads left a line of dust across the wheel, and misinterpreted them as actual grooves rather than dust-stains, but either way they ought to go. There are replacement resin wheels available, or you can just fill the grooves with putty or strip plastic and sand smooth. Note that the bolt heads around the wheel faces are a tad small and anaemic compared to photos � if this bothers you then replacements will be needed. The suspension represents the improved type with armoured covers for the struts, added at the factory after the first batches and upgraded on early tanks as and when they got shop-time. Because the arms pass through to lock into an inner rib inside the hull they could (in theory!) act like short torsion bars if you don�t glue them at the point where they exit the hull, but I wouldn�t test it too hard. Detail on the parts is good. The tracks represent Diehl D 640 type with replaceable rubber pads as fitted to later tanks (they come from the 1A4 kit), but most older tanks got these as & when the original non-replaceable rubber-chevron tracks wore out. (For the earlier track you need the Tamiya Leo 1 kit, but that�s about the only good part of it�) From past experience with the old Italeri 1A4 kit I know the suspension arms are fragile and the tracks are stiff enough to break axles. The Revell tracks are softer than the Italeri ones, but they will still pull hard on the idler mountings. Since the real tracks have no sag there really isn�t much �give� to compensate for the stiffness, and the biggest danger comes when fitting the tracks. To get round this you could drill out the idler arm and fit brass rod, but first I�d try to �train� the tracks into curves by dipping in hot water while bent, or with a hair dryer. Either way, cool them down afterwards with cold water to �set� the curve. (I�ve been known to make wooden forms for the tracks, so I can then heat them without having to hold them � I hate boiling my hands!) Fitting by stretching over the idler and sprocket is a non-starter. It�s better to add the inner half of the idler wheel, then the track, followed by the outer idler half so nothing needs to stretch. And since this all happens behind side skirts, it pays to assemble and paint the lower hull and suspension, before masking it off to paint the upper hull after the skirts are added. Bear in mind the tracks are old enough not to have decent end-connector detail, so it might be worth replacing them with plastic indy-link tracks from Peddinghaus. Turret The 1A5 comes with the early cast-steel turret, unlike the 1A4 that had a slab-sided design made of composite armour. Apparently the Italeri turret shape is not accurate around the front. Much has been made of this (see here and here for illustrated discussion), but frankly I can live with it. The real issue, when comparing it to the Tankograd drawings and real photos, is that it seems too �square-shouldered� around the frog-eyes, where the real thing had much more of an inward curve towards the roof that meant the range-finder blisters really stood out as tubes from the turret sides. Corrective surgery in the form of filing/sanding could sort this if needed. Of greater concern is the lack of mounting points for the add-on armour. These can be made up from a bit of rod (or even sprue), but it is an annoying omission. The Peddinhaus replacement resin turret at least had these moulded on, but I�m not sure if it is still in production. Hatches can be positioned open or closed, although there is nothing to fill the interior. And the main gun barrel is the usual two halves, so seem clean-up is required. As with so many kits of the post-dustcover period, the main gun elevation is fixed by the solid plastic �canvas�, something I have come to resent. Periscopes are all moulded-on lumps, and purists would argue that the rings around the hatches are too thick and should be replaced with photo-etch. There is a decent bustle rack that will try the patience of folk with less than three hands, and an �adequate� set of smoke launchers for the turret sides. For those all-important exercises this kit includes the barrel-mounted tubes for simulated main-gun action. The add-on armour has nice texturing. Since the 1A5 used a laser rangefinder there are blanking plates for the �frog-eyes� (although the rangefinders are still in the box) and a separate roof-mounted box with open doors for the new laser gubbins. Oh, and there�s a rotary beacon on a stick just begging to get broken off the turret roof! Pity the gum-ball is solid green instead of clear orange plastic� Finally, there is the matter of a smooth surface. I know that Leopards don�t have much roughness to the turret castings, but this part is far too smooth when compared to the �tooth� Italeri added on the rolled-steel hull surfaces. Stippled glue or Mr Surfacer is your friend here. Figure There�s a Tank Commander included, but perhaps the less said, the better! (He�s not bad by Italeri standards, but still not quite �right��) Decals A small sheet has markings for four tanks, three in Nato 3-tone camo and one in solid green. Markings are for: 2. Kompanie / PzBtl. 14, Hildesheim, 1990 Italian contingent, IFOR, Sarajevo, 1996 3. Kompanie / Pz AufklBtl. 1, Braunschweig, 1993 5. Kompanie / PzBtl. 413, Eggesin, 1992 Conclusion Despite its age, the old Italeri Leopard is still a decent kit � way beyond the standards of its time. Revell�s version cashes in on that value, and despite a few issues it can be built up to a very good standard. As I type this MENG have announced a new kit of the Leo 1A4 that will presumably be state-of-the-art, but that doesn�t mean these old warriors are any less worthy of attention. SUMMARY Highs: Sharp detail for an old kit! Weld seams, accurate dimensions, and a number of options. Lows: �Groovy� wheels, a fixed barrel height, incorrect intake grille. Verdict: Still worth buying and building if you like Cold War MBTs or Bundeswehr armour!  80% Scale: 1:35 Mfg. ID: 03028 PUBLISHED: Oct 12, 2013 NATIONALITY: GermanyNETWORK-WIDE AVERAGE RATINGS THIS REVIEWER: 84.20% MAKER/PUBLISHER: 83.55% DISCUSS THIS REVIEW About Tom Cromwell (barkingdigger) FROM: ENGLAND - EAST ANGLIA, UNITED KINGDOM A Yank living overseas on a long-term basis, I've been building tanks since the early '70s. I relish the challenges of older kits (remember when Tamiya was "new"?...) because I love to scratch-build. What round does the Leopard 2A4 use?The famous Rheinmetall L/44 120 mm cannon is mounted as the primary armament on the Leopard 2A4, offering a balance of firepower, accuracy and sustained rate of fire. The 2A4 has three rounds available to it: DM12 HEATFS, DM13 APFSDS and DM23 APFSDS. What is the difference between Leopard 2 and T 72?The Leopard 2 features advanced composite armor, which combines layers of steel, ceramics, and other materials to provide excellent protection against various types of threats. On the other hand, the T-72 primarily relies on conventional steel armor, which is generally less effective against modern anti-tank weapons. How good are the Leopard tanks?The Kampfpanzer Leopard 2, which Germany designed and built in the 1970s, is one of the most widely used tanks in the world, and is by far the most popular tank in NATO's inventory. It was so advanced for its time that even the mighty American M1 Abrams has some Leopard 2 DNA in it. Have Leopard 2 tanks seen combat?In the 2010s, Turkish Leopard 2 tanks saw action in Syria. In 2023-24, Ukrainian Leopard 2 tanks are seeing action in the Russo-Ukrainian War. |